Tee Times Tutorial
Below please find the necessary instructions to successfully:
Step-by-Step Instruction
- Configure your profile
-
Create a reservation:
- Sign-up for Events
-
Create a Notification
- Creating a Lottery Entry
Video Instruction
- Getting Started with MembersFirst Tee Times
- Creating a Tee Time
Configure Your Profile
The following information can be configured by you to enhance your tee sheet experience.
Updating Your Profile
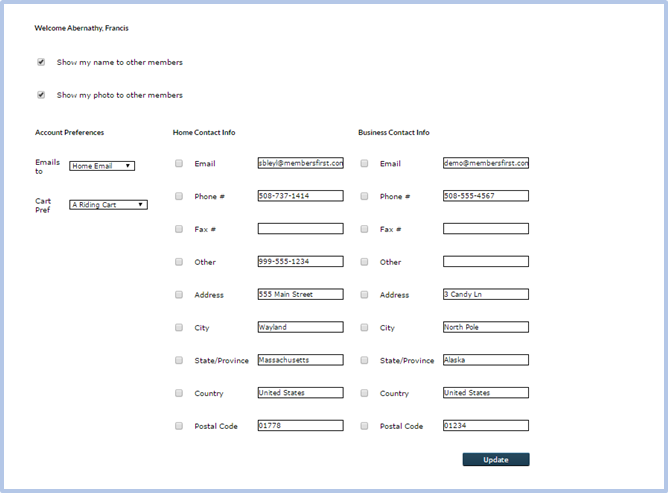
In most cases the tee sheet uses the same profile information that is present in the club’s website. We default your information to be suppressed to other members, however you can control what (if any) information can be viewed by your fellow members.
- The area labeled “MEMBER PREFERENCES” can be found on the Left Hand Navigation.
- Notice nothing is checked next to your information such as email, phone # and so on. If you wish to show this information to your fellow members, simply check the box next to the field you want to share with your members and hit update.
- A great time saver is to preset your cart preference. Here you can select what you would like as your default cart, and it will appear when making a tee time. However, it can be overridden per tee time.
- You can also indicate which or both of the email addresses on record you want your email confirmations sent to.
Playing Partners/Guest List
In these sections you have the ability to predefine your buddies and your common guests.
PLAYING PARTNERS
You can search the membership database and deem members to be added to your buddies list. Once flagged and updated, you will find these names listed in the tab labeled “Buddies” on the reservation booking screen.
GUEST LIST
You can search the guest database and flag guests as quick links to your “GUESTS” tab within the booking screen. On this screen, you also have the ability to create your own guests(this is also offered on the reservation booking screen).
Create a Reservation (Tee Time)
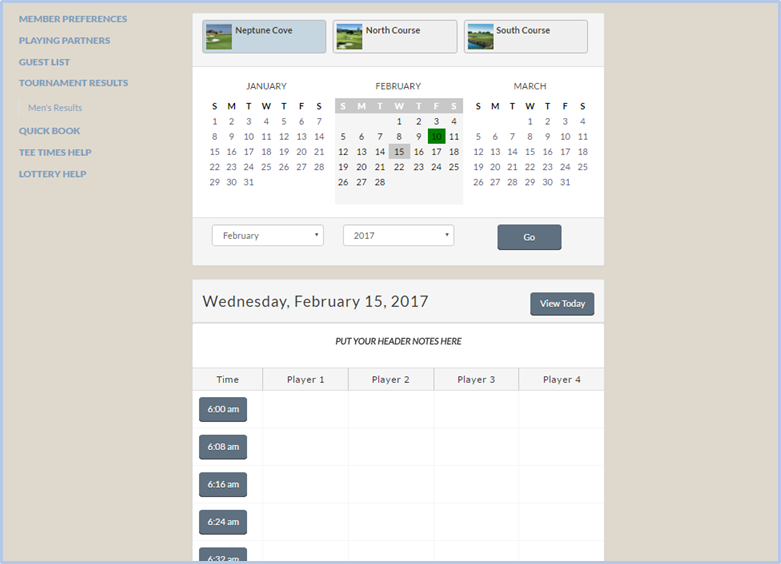
Step 1: Select a Date you Would Like to Play
The system provides a three month calendar view (one if on a mobile device). The prior month will assist to view old tee times for billing information and the future month will assist in planning your upcoming rounds. Please note the club may restrict the amount of days you can book in advance however you can still scroll to future months to view events, blocks, and start times. The day you are currently viewing is highlighted with a grey box and today’s date is highlighted in green.
Step 2: Search and Select a Time you Would Like to Play
The buttons down the left hand side of the screen will indicate the times which are available for booking. Once you find the time you would like to play click on the button. Notice the button is no longer present on spots that are already booked. For two and threesomes, the buttons will remain, as those spots can be reserved by other players. Your membership type will also dictate which times appear with buttons for booking privileges.
Step 3: Identify How Many Holes you Will be Playing
Pick the quantity of holes you will be playing during this round of golf. Notice, once you have entered this screen you have officially blocked this tee time from the staff and fellow members for a predetermined allotment of minutes (there will be a timer counting down). No one else will be able to enter into this time until you have finished making your reservation. If you choose not to take this time please select “Back to Tee Sheet”, the time will then be released back to the membership.
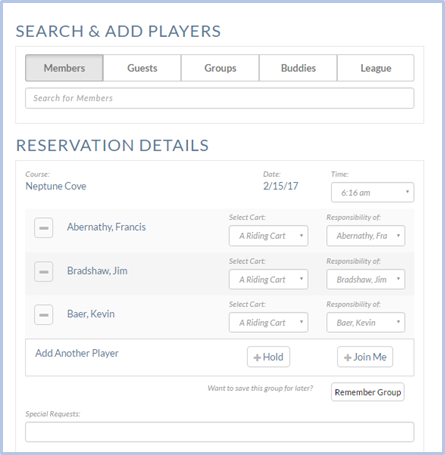
Step 4: Build your Tee Time
When you enter into the booking screen, your name will automatically be pulled into the "RESERVATION DETAILS" section. If you already selected your "Cart Preference" in the Member Preference tab, that information would have also pulled over automatically.
Add Fellow Members
Go To “SEARCH & ADD PLAYERS”
- Select the Members tab
- Type in either your fellow member’s first or last name.
-
A list of members will appear: Note there are three buttons that will appear.
- The plus sign (+), will add the member to your group.
- The “i” will show you any information your fellow member has shared.
- The bust icon will add that member to your Buddies tab which can be found in the same “SEARCH & ADD PLAYERS”
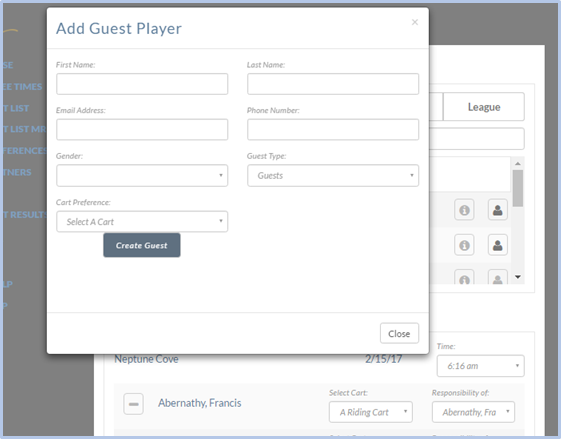
Add Guest Players
Note: If you are not adding guests skip to Finalizing Your Reservation
Go To “SEARCH & ADD PLAYERS”
- Select the Guests tab
- Our system has a universal guest database. Therefore you can first search to see if your guest is already in the system buy typing their first or last name.
- If your guest is not present you can then hit the plus icon (+) next to “Create a Guest”
- Fill in the appropriate information. Some clubs may make it mandatory to fill in either the email account or the phone number. Indicating the type of guest you will be bringing is an important step in this process, as some clubs use this for billing accuracy. When the information is filled in, click "Add Guest". Your guest has now been added to the Playing Group.
- If you don’t know the guest’s name for one reason or another, your club may choose to create a universal TBD Guest Name for convenience. However, to properly serve you and your guests at arrival, it’s always recommended to provide the guest names prior to your tee time.
Hold and Join Me Options
The system comes with two configurable options that clubs may or may not utilize.
Holds - This allows you to secure the spots in the group as you find other players to fill out your reservations. The holds have the ability to be released if a member or guest name is not filled in by a predetermined time allotment. You will want to check with the golf shop as to how long holds can stay within your reservation.
Join Me - This allows you to let the rest of the membership know they are welcome to join your group. This is a convenient way to fill your group if you are looking for players. It’s also convenient if you are a single and are looking for a game. This signifies the group is actively looking for players to join in.
Create Recurring Groups
If you play with the same individuals on a regular basis, you have the ability to remember (SAVE AS) your recurring reservations.
- You will want to create your reservation. Use the above instructions for assistance in making you group.
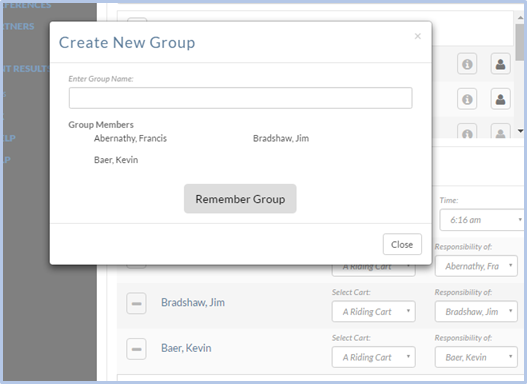
- Prior to finalizing and creating your reservation, navigate to the “Remember Group” button.
- The system will then ask for you to name your group and to remember your group.
- You can then select “Create Reservation”.
- The next time you want to create a tee time, go through the normal process of finding and selecting the time you wish to play.
- Once you get to the booking screen instead of searching for your playing partners, you can navigate to the “Groups” tab.
- Here you will find the prior groups that you have saved. To add a group you simply hit the plus button( +).
- The “i” will show you who is associated with your predefined group and even allow you to place the details into your reservation.
- The edit icon will allow you to make any permanent changes to your group, such as removing and replacing names, indicating cart types, and designating who is responsible for the guests.
- Once the group has been placed into the “RESERVATION DETAILS” section, edits can be made prior to creating your reservation.
Finalizing Your Reservation
Once all playing partners and guests have been added to the group, you can then add the cart preferences for each individual. This will help the golf shop with service and billing. If your email address is in your profile, an email confirmation will be sent upon creation of the reservation.
Notice once you have created an entry, you will have a red “x” next to your name along with others in your group directly on the tee sheet. This “x” is a quick way to delete people from your group.
Sign-up for Events
Step 1: Navigate to the Date and Time of the Event
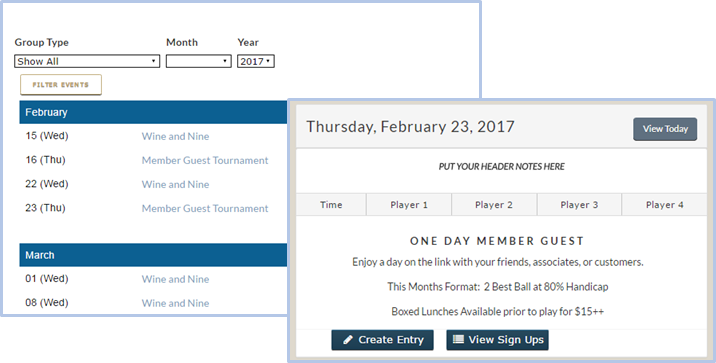
- If you are not sure of the date of the event, most clubs will offer a link to all club tournaments on the left hand side of the tee sheet.
- From there you can search and select the event you are looking for.
Step 2: "View Sign Ups" or "Create Entry"
In order to see other players who have already signed up for the event, you can click "View Sign Ups". This will display the members and guests who have been entered into the lottery for the event
Step 3: Building your Entry
This is the same process as building a tee time.
- Find you playing partners.
- Select your cart types.
- Indicate who is responsible for the guests.
- Select Create Reservations.
To get detailed instructions please read above.
Step 4: Adding Notes and additional information
You will notice an additional screen after you select “Create Reservation” has been added. This screen is where you can include any notes with your reservation. After which you may be direct to a secondary screen
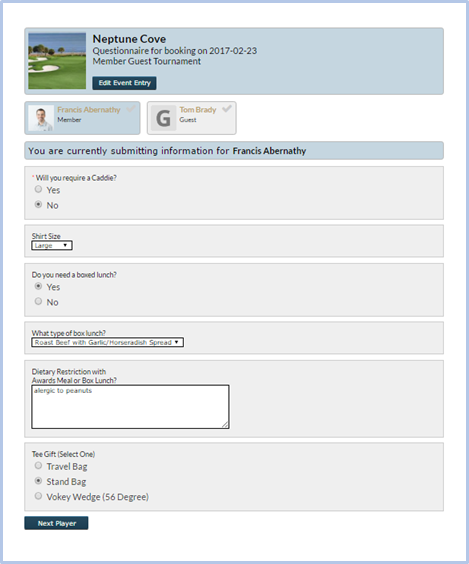
Some, but not all, events require information from you before you can finalize the registration. Events such as Members-Guests, the Golf Shop may want to collect your Guest’s home course, handicap index, shirt size and so on. If you are signing up for one of these events, you will be brought to this page after adding your notes. You may also notice some of the questions are date sensitive. If these questions are not answered prior to the date provided you will receive an email reminding you to provide the necessary information.
Editing an Entry
If you need to modify or cancel an entry please do the following:
- In the left hand navigation browse to “UPCOMING TEE TIMES”
- Find the Event Entry you would like to modify.
- If you are simply providing the golf shop with information that was asked in the process such as handicap or shirt size, you can jump to the question form by hitting “Event Questionnaire”
- If you want to modify names, quantity of people or cancel the reservation hit “Change”
- You will be directed to the day of the event.
- Here you can quickly cancel your reservation by hitting the red button labeled “Cancel Entry”
- To adjust names and quantities select Modify Entry and adjust accordingly.
Joining the Waitlist
Some events may offer the ability to join the waitlist. If you navigate to the event you may notice the “Create Entry” button is no longer available and the button may say “Sold Out”. A secondary button may appear which offers you to “Join Waitlist”, by selecting this button, it’s going to bring you through the event signup process, however, your entry will not be placed into the event. In the event a spot does open up and you are the next in line to join the event, you will be placed in and then notified via email of your placement.
Creating a Notification Request
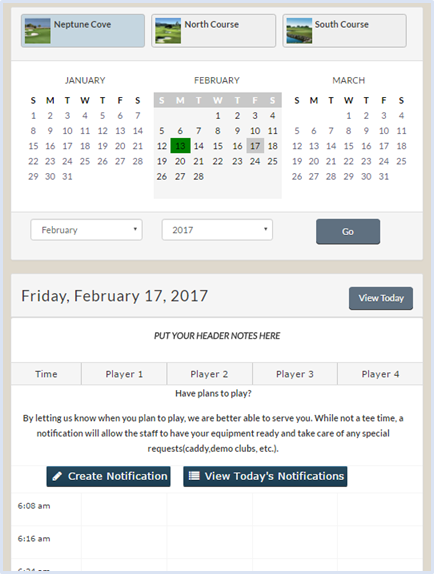
Notifications are a way for clubs that don’t accept tee times but still want to offer its members the ability to let the club know they will be playing the course on a certain day, around a specific time. These are not tee times, but more of a heads up which will allow the club staff to better service you and your guests.
The system provides a three month calendar view (one if on a mobile device). The prior month will assist to view old tee times for billing information and the future month will assist in planning your upcoming rounds. Please note the club may restrict the amount of days you can book in advance however you can still scroll to future months to view events, blocks, and start times. The day you are currently viewing is highlighted with a grey box and today’s date is highlighted in green. Then select the “Create Notification” button.
Step 2: Identify How Many Holes you Will be Playing
Pick the quantity of holes you will be playing during this round of golf. Notice, once you have entered this screen you have officially blocked this tee time from the staff and fellow members for a predetermined allotment of minutes (there will be a timer counting down). No one else will be able to enter into this time until you have finished making your reservation. If you choose not to take this time please select “Back to Tee Sheet”, the time will then be released back to the membership.
Step 3: Build your Tee Time
When you enter into the booking screen, your name will automatically be pulled into the "RESERVATION DETAILS" section. If you already selected your "Cart Preference" in the Member Preference tab, that information would have also pulled over automatically.
Add Fellow Members
Go To “SEARCH & ADD PLAYERS”
- Select the Members tab
- Type in either your fellow member’s first or last name.
-
A list of members will appear: Note there are three buttons that will appear.
- The plus sign (+), will add the member to your group.
- The “i” will show you any information your fellow member has shared.
- The bust icon will add that member to your Buddies tab which can be found in the same “SEARCH & ADD PLAYERS”
Add Guests
Note: If you are not adding guests skip to Finalizing Your Group
Go To “SEARCH & ADD PLAYERS”
- Select the Guests tab
- Our system has a universal guest database. Therefore you can first search to see if your guest is already in the system buy typing their first or last name.
- If your guest is not present you can then hit the plus icon (+) next to “Create a Guest”
- Fill in the appropriate information. Some clubs may make it mandatory to fill in either the email account or the phone number. Indicating the type of guest you will be bringing is an important step in this process, as some clubs use this for billing accuracy. When the information is filled in, click "Add Guest". Your guest has now been added to the Playing Group.
- If you don’t know the guest’s name for one reason or another, your club may choose to create a universal TBD Guest Name for convenience. However, to properly serve you and your guests at arrival, it’s always recommended to provide the guest names prior to your tee time.
Create Recurring Groups
If you play with the same individuals on a regular basis, you have the ability to remember(SAVE AS) your recurring reservations.
- You will want to create your reservation. Use the above instructions for assistance in making you group.
- Prior to finalizing and creating your reservation, navigate to the “Remember Group” button.
- The system will then ask for you to name your group and to remember your group.
- You can then select “Create Reservation”.
- The next time you want to create a tee time, go through the normal process of finding and selecting the time you wish to play.
- Once you get to the booking screen instead of searching for your playing partners, you can navigate to the “Groups” tab.
- Here you will find the prior groups that you have saved. To add a group you simply hit the plus button( +).
- The “i” will show you who is associated with your predefined group and even allow you to place the details into your reservation.
- The edit icon will allow you to make any permanent changes to your group, such as removing and replacing names, indicating cart types, and designating who is responsible for the guests.
- Once the group has been placed into the “RESERVATION DETAILS” section, edits can be made prior to creating your reservation.
Finalizing Your Reservation
- Once all playing partners and guests have been added to the group, you can then add the cart preferences for each individual. This will help the golf shop with service and billing.
- After hitting the Create Reservation button you will be brought to select time option, similar to the screen above. Here you will want to let the Golf Shop know around the time you will be playing.
- If your email address is in your profile, an email confirmation will be sent upon creation of the reservation.
Creating a Lottery Entry
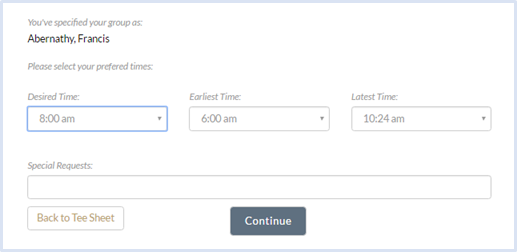
Similar to that of a tournament entry the lottery requests allows you to indicate if you wish to play on a certain day. The difference being, during your registration request you will be prompted to indicate your desired time, earliest time and latest time you wish to play. Each club handles how the lottery is determined. I would refer to your club for the specific rules of the lottery.
Step 1: Navigate to the Date and Time of the Lottery
Step 2: "View Sign Ups" or "Create Entry"
In order to see other players who have already signed up for the lottery, you can click "View Sign Ups". This will display the members and guests who have been entered into the lottery.
Step 3: Building your Entry
This is the same process as building a tee time.
- Find you playing partners.
- Select your cart types.
- Indicate who is responsible for the guests.
- Select Create Reservations.
To get detailed instructions please read above.
Step 4: Selecting Your Times
You will want to select the three times that make the most sense for your group. The further apart you put the Earliest Times and Latest Time the more likely you are to receive a time. Meaning if you put the only available your group has to play is from 7:00 to 7:20 that might not be a large enough window if additional groups are looking for the same times. You could be risking getting blocked out of a tee time altogether.
You will want to check with your club as to when they publish the awarded times and if you have the ability to edit the times after the lottery has been run.
Video Instruction
Getting Started with MembersFirst Tee Times
Creating a Tee Time
|